


We attach great importance to customers' needs for product quality and rapid production.
We always insist that meeting customers' needs is to realize our value!
+86 133 9281 9446
Oct. 22, 2025

Leo Lin.
I graduated from Jiangxi University of Science and Technology, majoring in Mechanical Manufacturing Automation.
You should choose between 3D Printing vs Vacuum Casting based on your project goals. 3D printing suits low-volume production and rapid prototyping, while vacuum casting works best for detailed replicas and small batch runs. Consider these factors when making your decision: cost, material options, speed, finish quality, accuracy, scalability, and application fit.
In Q1 2025, shipments of entry-level 3D printers increased by 15% year-over-year, exceeding one million units globally.
The 3D printing market in North America reached $8.61 billion in 2024, with an expected growth rate of about 18.6% CAGR through 2034.
The U.S. 3D printing market was estimated at $5.93 billion in 2024, showing strong growth.
When you compare 3d printing vs vacuum casting, you notice several key differences that affect your project choices. The following table highlights the main technical aspects:
Aspect | 3D Printing | Vacuum Casting |
|---|---|---|
Production Costs | More cost-effective for small volumes; costs decrease with volume | More economical for larger batches; molds can be reused 20 times |
Strength | May exhibit anisotropy; strength varies by direction | Strong parts with consistent properties due to polyurethane resins |
Tooling Costs | No expensive molds needed; only requires a 3D model | Initial cost for silicone molds, but cheaper than other methods |
Design Freedom | Allows intricate geometries; complex designs possible | Limited by master model; intricate features complicate mold-making |
Production Speed | Fast for low-volume production; parts can be ready in hours | Slower due to mold creation; faster per part in batch production |
Finishes | May require post-processing for smooth finish | Excellent surface detail; less post-processing needed |
You can see that 3d printing gives you more design freedom. You can create complex shapes and custom parts quickly. Vacuum casting, on the other hand, produces parts with excellent surface detail and consistent strength. It works best when you need multiple copies of a part with a smooth finish.
Material options also differ between the two methods. 3d printing uses various plastics, which are ideal for prototyping and custom designs. Vacuum casting uses specific materials, often polyurethane resins, that mimic the properties of production plastics. This makes vacuum casting suitable for parts that need to look and feel like final products.
Choosing between 3d printing vs vacuum casting depends on your project goals. Here are some scenarios to help you decide:
Use 3d printing when you need rapid prototyping. You can quickly test new ideas and make changes without waiting for molds.
Choose 3d printing if your design has complex geometries or requires customization. This method lets you create shapes that are difficult or impossible with traditional manufacturing.
3d printing is also effective for early-stage design iterations. You can produce one-off parts or small batches in a short time.
Vacuum casting is the better choice when you need high-quality, durable parts for small batch production. This method is popular in industries like automotive, electronics, and medical devices. For example, you might use vacuum casting to test dashboard components, electronic housings, or ergonomic medical prototypes. The process offers high accuracy and smooth finishes, making it ideal for parts that need to look and feel like the final product.
Vacuum casting also bridges the gap between prototyping and full-scale manufacturing. You start with a master model, create a silicone mold, and then produce multiple parts quickly and cost-effectively. This approach works well when you need to test a design before committing to expensive injection molding.
Tip: If you want to test a new product design with a small group of users, vacuum casting gives you production-like parts without the high cost of traditional tooling.
You can choose from several 3d printing technologies, each with unique strengths for different applications. The main types include FDM, SLA, SLS, and SLM. The table below compares these technologies:
Technology | Operation Principle | Material Printed | Advantages | Applications | Layer Thickness |
|---|---|---|---|---|---|
FDM | Extrudes melted filament | Thermoplastic polymers | Low cost, fast printing | Fast prototyping, education | 0.1 – 0.3 mm |
SLA | Uses UV light to cure resin | Photocurable resins | High detail, smooth finish | Dental models, intricate prototypes | 0.05 – 0.15 mm |
SLS | Laser sinters powder | Polyamide powders | No support needed, strong parts | Functional prototypes | 0.06 – 0.15 mm |
SLM | Laser melts metal powder | Metal alloys | Durable, complex metal parts | Automotive, aerospace | 0.02 – 0.1 mm |
These 3d printing methods give you design freedom and allow you to create high complex parts that traditional manufacturing cannot match. You can print robust prototypes, detailed models, and even end-use components. Additive manufacturing also supports a wide range of materials, from plastics to metals.
Tip: 3d printing lets you iterate quickly and test new ideas without waiting for expensive tooling.
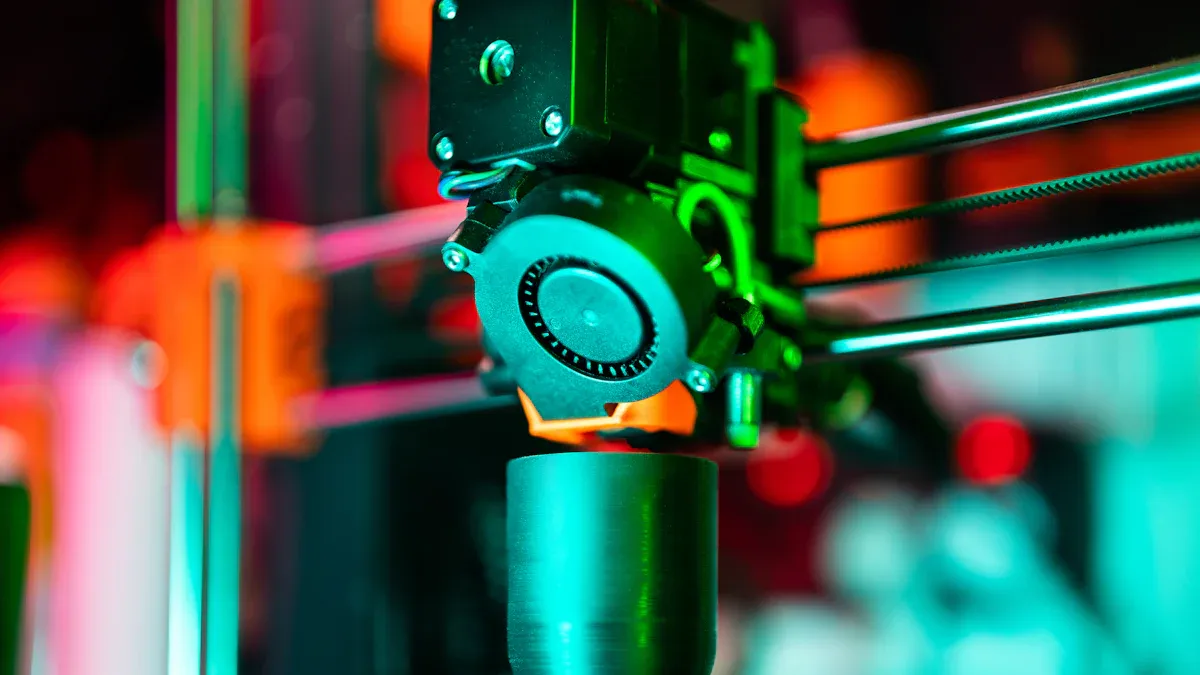
The 3d printing workflow starts with your digital design. You create a 3D model using CAD software. Next, you slice the model into layers and send it to the printer. The printer builds the part layer by layer, following your design exactly. After printing, you may need to remove support structures or perform post-processing like sanding or painting. This process enables you to move from concept to physical part in just a few hours.
You benefit from high precision, excellent surface finish, and fast turnaround. 3d printing is ideal for rapid prototyping, custom parts, and low-volume production. You can also use it to test fit, form, and function before moving to injection molding.
Vacuum casting is a manufacturing process that helps you produce high-quality parts in small batches. The process follows these steps:
Prepare a master model, often made with 3d printing or CNC machining.
Place the master in a mold box and pour liquid silicone over it.
Use a vacuum chamber to remove air bubbles from the silicone.
Cure the silicone and cut the mold to release the master.
The silicone mold is now ready for casting.
Select the right polyurethane resin for your part.
Pre-treat the mold for easy part removal.
Mix and degas the resin.
Pour the resin into the mold under vacuum.
Cure the mold to solidify the part.
Remove the finished part and perform any needed finishing.
This workflow allows you to create multiple copies of a part with consistent quality. Vacuum casting is especially useful when you need to bridge the gap between prototyping and injection molding.
You use polyurethane resins in vacuum casting to mimic the properties of production plastics. These resins can match the look and feel of final products. The silicone molds capture fine details and complex shapes, ensuring material fidelity and dimensional accuracy. Vacuum casting also reduces defects by minimizing air entrapment.
You can apply vacuum casting to automotive components, medical devices, and consumer electronics. The process gives you high-quality parts with excellent surface texture and material consistency. It is a smart choice when you want to test a design before investing in injection molding.
Note: Vacuum casting delivers production-like results for small series, making it a reliable option for functional testing and market validation.
When you consider 3d printing for your project, you notice several advantages and disadvantages. The main advantage is flexibility. You can create complex shapes and change your design quickly. You do not need expensive molds or tooling. This process gives you the ability to test ideas and make adjustments without long delays.
Here are some key advantages of 3d printing:
You get design flexibility. You can produce intricate parts and custom features.
Production speed is high. You can have prototypes ready in hours.
The process is cost-effective for small batches. You save money on tooling.
Material efficiency is strong. You use only what you need for each part.
Lower development costs come from a simplified workflow.
However, you should also consider the disadvantages:
Initial equipment costs can be high. Business-grade printers may cost between £5,000 and £15,000.
You need to pay for materials, training, and maintenance.
3d printing is not suitable for assemblies with many parts.
Material limitations exist. You cannot print with wood, cloth, or rock.
The process is slower for mass production.
The table below summarizes the main advantages and disadvantages:
Advantages | Disadvantages |
|---|---|
Design flexibility | Initial equipment costs |
Production speed | Material limitations |
Cost-effectiveness | Slower for mass production |
Material efficiency | Not suitable for assemblies |
Tip: You can achieve long-term savings with 3d printing, even though the initial investment is high. The flexibility of this method helps you adapt to changing project needs.
Vacuum casting offers a different set of advantages and disadvantages. You benefit from flexibility in material selection and surface finish. This process works well for small batch production and gives you parts that look and feel like final products.
Advantages of vacuum casting include:
You get excellent surface detail and finish.
The process supports flexibility in creating multiple copies of a part.
You can use specific materials like thermoplastics and rubber.
The method is ideal for functional testing and market validation.
Disadvantages you should consider:
Vacuum casting is only compatible with certain materials. You cannot use it for high-temperature applications.
The process is slow, which makes it less suitable for high-volume production.
Scalability is limited. You cannot easily ramp up to mass production.
Note: Vacuum casting gives you flexibility for small series, but you need to plan carefully if you want to scale up your production.
Both 3d printing and vacuum casting offer flexibility, but each has unique advantages and disadvantages. You should weigh these factors based on your project goals, budget, and timeline.
When you start a new project, cost considerations play a big role in choosing between 3D printing and vacuum casting. You want to know how much money you need before you begin. The initial investment for each method is different. Here is a table that shows the main differences:
Method | Initial Investment Description |
|---|---|
3D Printing | Low initial investment; no mold costs; equipment costs range from thousands to hundreds of thousands of yuan. |
Moderate initial investment; costs include prototype development and silicone molds, which can be reused multiple times. |
You see that 3D printing offers a cost-effective way to start. You do not need to pay for expensive molds. You only need a printer and materials. This makes 3D printing a cost-effective solution for projects with frequent design changes or small production runs. Vacuum casting requires a moderate investment. You need to create a master model and silicone molds. These molds can be used many times, which helps lower the cost over several batches.
Tip: If you want to test many designs or make quick changes, 3D printing gives you more design flexibility with less upfront cost.
After you set up your equipment, you need to think about the cost of each part you make. Per-part cost depends on the method you choose, the number of parts, and the materials you use.
With 3D printing, you pay for the material and machine time for each part. This method is a cost-effective way to produce small batches or custom pieces. You do not need to pay for new molds every time you change your design. This makes 3D printing a cost-effective way for prototypes and low-volume production.
Vacuum casting works best when you need several copies of the same part. The cost per part drops as you make more pieces because you reuse the silicone mold. This method is a cost-effective way for small batch production. You pay for the mold and the resin, but you can make up to 20 parts from one mold. If you need more parts, you make new molds, which adds to the cost.
Cost efficiency factors include the number of parts, material choice, and production speed. If you need only a few parts, 3D printing is usually cheaper. If you need many identical parts with a smooth finish, vacuum casting may save you money.
Note: Always compare the total cost for your project, including setup and per-part costs, before you decide which method to use.
You have many choices when it comes to materials for 3D printing. Each type offers unique benefits for different applications. If you want to create strong and durable parts, metals like stainless steel, titanium, aluminum, and nickel alloys are popular. These metals work well for industrial uses and can handle tough environments.
Ceramics such as zirconia, alumina, and silica give you high resistance to heat and chemicals. You might use ceramics for parts that need to survive extreme temperatures or harsh chemicals. Composites, including carbon fiber, Kevlar, and fiberglass, combine materials to boost strength and reduce weight. These are great for aerospace or automotive projects.
Bio-based materials like polyhydroxyalkanoate offer renewable and biodegradable options. You can choose these if you want to reduce your environmental impact. Gel-based materials, such as Dimengel, help you print large-scale objects with unique properties. Plastics like PETG are common in 3D printing because they provide good mechanical strength and flexibility.
Here is a quick overview of common 3D printing materials:
Metals (stainless steel, titanium, aluminum, nickel alloys)
Ceramics (zirconia, alumina, silica)
Composites (carbon fiber, Kevlar, fiberglass)
Bio-based materials (polyhydroxyalkanoate)
Gel-based materials (Dimengel)
Plastics (PETG)
Tip: You should select your material based on the part’s function, environment, and required strength. Each material brings its own set of advantages.
Vacuum casting gives you a wide range of material choices for prototyping and small batch production. You can use rubber, ABS, PC, PMMA, PP, and polyurethanes. These materials help you create parts that look and feel like final products.
Polyurethanes are especially versatile. You can mimic the properties of ABS and PE/PP, making both rigid and flexible parts. Rubber and plastics like ABS, PC, PMMA, and PP are common for creating prototypes and production parts. Vacuum cast resins offer durability, stiffness, and chemical resistance. You might use these for holding fixtures, jigs, or guides in machinery.
The table below summarizes popular vacuum casting materials and their properties:
Material Type | Properties | Applications |
|---|---|---|
Vacuum Cast Resin | Durable, stiff, chemical resistant, absorbs vibrations | Holding fixtures, jigs, guides for machinery |
Rubber and Plastics (ABS, PC, PMMA, PP) | Commonly used materials | Prototyping and production |
Polyurethanes | Mimic ABS and PE/PP, rigid or flexible | Versatile casting options |
You can choose from these materials to match your project’s needs. If you want flexible parts, rubber and soft polyurethanes work well. For rigid and strong components, ABS and stiff resins are ideal.
Note: Material selection in vacuum casting affects the final part’s look, feel, and performance. You should always match the material to your application for the best results.
You want your prototypes and parts delivered quickly. The turnaround time for 3D printing and vacuum casting can vary a lot. 3D printing gives you fast results. You can receive simple prototypes in just a few hours. Complex designs may take up to a couple of days. This speed helps you test ideas and make changes without waiting long.
Vacuum casting takes more time. You need to create a master model and a silicone mold before casting begins. The whole process usually requires 9 to 15 days. Each casting cycle can take 6 to 8 days. The extra steps mean you wait longer for your finished parts. If you need several identical parts with a smooth finish, vacuum casting works well, but you must plan for a longer production time.
Here is a quick comparison:
Method | Typical Turnaround Time |
|---|---|
3D Printing | Hours to a few days |
Vacuum Casting | 9–15 days (including mold prep) |
Tip: If you need a prototype fast, 3D printing is your best choice. If you want multiple copies with high detail, vacuum casting is worth the wait.
Many things can change how fast you get your parts. In 3D printing, the size and complexity of your design matter. Large or intricate models take longer to print. The type of printer and material also affect speed. Some printers work faster with certain plastics or metals.
Vacuum casting involves several stages. You must pour the resin, let it solidify, and allow it to cool. Each stage needs careful control. Temperature and humidity in the workspace can slow down the process. If conditions are not right, you may see defects in the finished part. The choice of material and the design of the mold also play a big role. Some resins cure faster than others. Simple molds speed up casting, while complex shapes take longer.
You can use these tips to improve speed:
Choose simple designs for faster results.
Pick materials that cure quickly.
Control temperature and humidity during casting.
Use efficient mold designs.
Note: Always plan your project timeline based on the method you choose and the factors that affect speed. This helps you avoid delays and meet your goals.
When you compare 3D printing and vacuum casting, you notice clear differences in surface quality. Surface quality affects how your part looks and feels. It also impacts the level of precision you can achieve. Here is what you can expect from each method:
Vacuum casting produces parts with a surface quality and smoothness that matches injection-molded components. You get a finish that feels professional and looks polished.
3D printing allows you to create intricate designs, but it does not reach the same level of detail or smoothness as vacuum casting. You may see visible layer lines or slight texture on the surface.
Vacuum casting works best for small-batch production and prototypes that need realistic material properties and high precision.
If you want a part that looks like a final product, vacuum casting gives you the edge. You can achieve high precision in both the shape and the finish. 3D printing offers flexibility and design freedom, but you may need extra post-processing to reach the same level of surface quality. When you need high precision and a smooth finish, vacuum casting stands out as the better choice.
Tip: For display models or parts that need to impress, choose vacuum casting for its superior surface quality and high precision.
Tolerances measure how close your finished part matches your design. High precision in tolerances means your part will fit and function as intended. Both 3D printing and vacuum casting offer good precision, but you should know the typical ranges. The table below shows standard tolerances for these methods:
Nominal Dimension Range | Standard Tolerance | Notes / Key Considerations |
|---|---|---|
0 – 100 mm (0 – 4 in) | ±0.3 mm (±0.012 in) | This is the baseline tolerance for most features. Tighter tolerances (±0.15 mm) are often achievable on well-designed smaller features. |
100 – 500 mm (4 – 20 in) | ±0.3% of the dimension | For larger dimensions, the tolerance becomes a percentage of the length due to the cumulative effect of material shrinkage. |
500+ mm (20+ in) | ±0.4% of the dimension | Very large parts are more susceptible to minor warping and shrinkage variations, requiring a slightly wider tolerance range. |
Typical Wall Thickness | ±0.2 mm (±0.008 in) | This tolerance applies to the thickness of a designed wall section. |
Hole Diameters | ±0.2 mm (±0.008 in) | For standard-sized holes. Very small or very deep holes may require a wider tolerance. |
Part-to-Part Repeatability | ~ ±0.15 mm | The expected variation between identical parts cast from the same mold. |
You can achieve high precision with both methods, especially for small features. For parts under 100 mm, you often reach tolerances as tight as ±0.15 mm. This level of precision ensures your parts fit together and work as planned. As your parts get larger, maintaining high precision becomes more challenging. Material shrinkage and warping can affect the final result. You should always design with these tolerances in mind to get the best precision.
If your project demands high precision, pay close attention to tolerances. Choose the method that matches your needs for accuracy and surface quality. Both 3D printing and vacuum casting can deliver high precision, but your design and material choice will influence the final outcome.
Note: Always check your design and production method to ensure you reach the level of precision your project requires.
You want a process that adapts to your changing needs. Scalability matters when you move from a single prototype to multiple design iterations. 3D printing gives you the flexibility to scale your prototyping efforts. You can use cloud-connected printers to produce parts on demand. This lets you adjust designs quickly and print several ideas at once. You explore more options than with traditional methods.
Prototyping with 3D printing supports rapid prototyping and net-shape prototyping. You create models that match your final design, test them, and make changes without waiting for new molds. You can print different shapes, sizes, and materials. This helps you compare results and choose the best solution. You save time and resources by printing only what you need.
Vacuum casting also supports prototyping, but with some limits. Silicone molds last for about 25–30 uses. You produce a small number of polished parts for testing or marketing. This method works well when you need realistic prototypes that look and feel like finished products. You use vacuum casting to validate your design before investing in full tooling.
Tip: Use 3D printing for early-stage prototyping and design exploration. Choose vacuum casting when you need polished prototypes for presentations or user testing.
You need a process that scales from prototyping to low-volume production. 3D printing offers a flexible solution for companies that want extra capacity. You print end-use parts in small batches, often more cost-effectively than traditional methods. In recent years, more businesses use 3D printing for low-volume production and mass customization. You benefit from quick turnaround and the ability to change designs between batches.
Here is how 3D printing supports low-volume production:
You produce multiple parts at once, even with different designs.
You adjust production quickly to meet new requirements.
You avoid the cost and delay of making new molds.
Vacuum casting is ideal for producing 20–100 parts for testing or marketing. You use silicone molds to create polished parts that match your final product. The process is not suitable for high-temperature or structural applications. You must remember that mold lifespan limits the number of parts you can make. Vacuum casting helps you bridge the gap between prototyping and full-scale manufacturing.
You choose 3D printing for low-volume production when you want speed, flexibility, and cost savings. You select vacuum casting when you need a small batch of high-quality parts for validation or market feedback.
Note: Always match your production method to your project’s scale and goals. Both 3D printing and vacuum casting help you move from prototyping to low-volume production, but each has unique strengths.

You can use 3d printing in many industries. This technology helps you create custom parts and prototypes quickly. You see it in healthcare, where doctors use it for custom prosthetics and surgical tools. In aerospace, engineers make lightweight engine components and produce parts on demand. Automotive companies rely on 3d printing for prototyping and building lightweight performance parts. Architects design 3d-printed homes and custom structures. Fashion brands use it for custom-fit footwear and personalized products.
Here is a table that shows common applications in 2025:
Sector | Examples of Applications |
|---|---|
Healthcare | Custom prosthetics, surgical tools, bioprinted tissues |
Aerospace & Aviation | Lightweight engine components, on-demand manufacturing |
Automotive | Custom parts, prototyping, lightweight performance parts |
Architecture & Construction | 3D-printed homes, custom designs, disaster relief housing |
Consumer Goods & Fashion | Custom-fit footwear, sustainable fashion, personalized products |
You can see that 3d printing supports innovation and helps you solve complex problems. You can create functional prototypes and test new ideas before moving to production.
Vacuum casting is a smart choice for product development and manufacturing. You use it to produce realistic prototypes and test design flaws. This method works well for small batch production of custom parts. You can create durable prototypes for functional testing and validation. Artists and designers use vacuum casting to make unique, detailed pieces. Some niche industries use vacuum casting for end-use parts that require compliance and high performance.
The table below highlights leading use cases:
Use Case | Description | Outcomes |
|---|---|---|
Prototype Development | Producing realistic prototypes for testing design flaws. | Reduced development cycles by up to 30%. |
Small Batch Production | Ideal for low-volume manufacturing of custom parts. | Shorter lead times and reduced upfront investment. |
Functional Testing & Validation | Creating durable prototypes for rigorous testing conditions. | Reduced risk of costly failures in later stages. |
Custom and Artistic Components | Producing unique, detailed pieces for artists and designers. | High customer satisfaction and personalized products. |
End-Use Parts in Niche Industries | Utilizing vacuum casting for actual product deployment in specialized fields. | Focus on compliance and functional performance. |
You benefit from vacuum casting when you need high-quality, custom parts for testing or market feedback.
You can combine 3d printing and vacuum casting to improve your product development cycle. This approach gives you several advantages:
You speed up production by using vacuum casting to create high-fidelity prototypes quickly.
You save money because reusable silicone molds lower tooling costs compared to traditional methods.
You achieve high detail reproduction, as vacuum casting delivers excellent surface finish and accuracy for prototypes that closely match final products.
You start with 3d printing to make a master model. Then you use vacuum casting to produce multiple copies for testing or small batch production. This strategy helps you move from concept to market faster and with less risk.
Tip: Use both methods together to get the best results in speed, cost, and quality for your custom parts and prototypes.
Choosing between 3d printing and vacuum casting can feel challenging. You want to make sure your project meets your goals for design validation, speed, and quality. Start by asking yourself these key questions. The table below helps you compare both methods based on important factors:
Key Considerations | Vacuum Casting | 3D Printing |
|---|---|---|
Surface Finish | Superior surface finish and dimensional accuracy | May require post-processing for better finish |
Design Complexity | Ideal for parts resembling injection molded products | Excellent for complex shapes and internal features |
Economical for larger quantities after upfront costs | No tooling costs, suitable for one-off prototypes | |
Turnaround Time | Involves mold preparation time | Extremely fast iteration speeds |
Batch Size Suitability | Best for small batch production | Perfect for rapid prototyping and very low volumes |
Strong material properties for functional testing | May lack mechanical consistency without post-processing |
Ask yourself these questions before you decide:
Do you need a high-quality surface finish for your design validation?
Does your part have complex shapes or internal features?
Are you producing a small batch or just a few prototypes?
How quickly do you need your parts for design validation?
Is your budget better suited for upfront tooling or flexible, per-part costs?
Will your parts require strong material properties for functional testing or design validation?
You can use the following flowchart to guide your decision. Follow each step to see which process fits your needs best:
Do you need parts quickly for design validation?
Yes → Go to Step 2
No → Go to Step 3
Are your parts highly complex or customized?
Yes → 3d printing is likely your best choice.
No → Go to Step 4
Do you need a high-quality surface finish and strong material properties?
Yes → Vacuum casting is a strong option.
No → Go to Step 5
Is your batch size small (under 20 parts)?
Yes → 3d printing works well for low volumes.
No → Vacuum casting may be more cost-effective for small batches.
Do you need to test the look and feel of an injection-molded product?
Yes → Vacuum casting provides realistic prototypes.
No → 3d printing gives you flexibility for rapid changes.
Tip: Always match your process to your project’s needs. Consider speed, surface finish, batch size, and the importance of design validation.
You should choose 3D printing for rapid prototyping and complex designs, while vacuum casting works best for small batches with a smooth finish. If your project needs 1–50 parts on a tight budget, vacuum casting is cost-effective. For detailed testing or tight tolerances, consider other methods.
Key Factor | What to Consider |
|---|---|
Material Compatibility | Will the material meet your needs? |
Production Volume | How many parts do you need? |
Time Limitations | How fast do you need your parts? |
Durability Needs | Will your parts face tough testing or display use? |
Review your goals, budget, and timeline before you decide which process fits your project best.
3D printing builds parts layer by layer from digital files. Vacuum casting uses a silicone mold to create multiple copies of a master model. You get more design freedom with 3D printing. Vacuum casting gives you smoother finishes.
You get prototypes faster with 3D printing. Most simple parts finish in hours or a day. Vacuum casting takes longer because you must make a mold first.
Yes, you can use both for production. 3D printing works well for low-volume or custom parts. Vacuum casting suits small batches that need a high-quality finish.
3D printing supports plastics, metals, ceramics, and composites. Vacuum casting uses polyurethane resins and rubbers that mimic production plastics. You should choose based on your part’s needs.
You can usually make 20 to 30 parts from one silicone mold. Mold life depends on part complexity and material. For more parts, you need new molds.
Yes, most 3D printed parts need some post-processing. You may sand, paint, or polish them to improve surface quality. Vacuum cast parts often need less finishing.
Vacuum casting gives you better surface detail and a smoother finish. 3D printing can show layer lines, especially on curved surfaces.
For very small batches or prototypes, 3D printing is usually more cost-effective. For small runs of 20 or more, vacuum casting often lowers the per-part cost.
We attach great importance to customers' needs for product quality and rapid production.
We always insist that meeting customers' needs is to realize our value!
